Building your own Glass panel

eagle_ecu_hmi_blogWhile its certainly a lot easier to lay out some cash and pick up a ready to fly glass panel, its highly unlikely you will find one that will communicate with your Precision Airmotive Eagle ECU. That was my challenge. Once I discovered that the Eagle ECU supported the industry standard Modbus communications protocol, the main hurdle had been crossed. The next was finding a display that would function in a bright cockpit and aviation environment. An American company called Horner has been designing and manufacturing programable controllers and control screens for years and I had been using them in a multitude of industrial and agricultural applications with success. It wasn’t until they rolled out the XL7 product line that the final hurdles could be overcome. A display that comes close to my Dynon skyview for brightness. It is touch activated and has hard keys along its right side. The unit has a number of features that I am exploiting for my application.XL7_FaceAngle_1_RGB-300x300

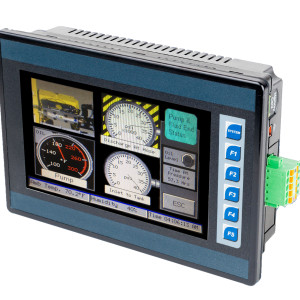
Present design interfaces to a GPS puck, the two Eagle ECUs and the Dynon serial data port. I also included a separate airspeed transducer to act as backup to Dynon. Its been a bit of work making it all come together over the last year. This unit will never replace a Dynon or Garmin for synthetic vision or moving maps but it does sweet work with trend displays and the handling of large packages of data. In the event of a Dynon failure, I can still safely fly and navigate my way to a safe landing site.The programming software which can be freely downloaded from the Horner website allows the user to program applications for whatever their creative minds desire. I’ll explain what I have done as time permits in future posts to this blog.

Here is a summary of the XL7 from the company web site:

  • All units feature a high-resolution wide aspect ratio 7″ WVGA Color Touch Screen with 1000 nits of brightness. The innovative display provides high outdoor visibility and allows the XL7 to be used in a wide variety of ambient condition applications.
  • Built-in digital & analog I/O with two 1MHz high-speed counters
  • Dual 10/100 Ethernet for factory and world-wide networking adding flexibility when linking to factory networks like Modbus/TCP and Ethernet/IP, while performing standard functions such as: web serving, FTP file transfer, E-mail and protocol support.
  • Dual CAN Ports for fieldbus flexibility. One port utilizes CsCAN for Distributed Plug and Play I/O over a 500m distance. The second port provides support for CANopen and J1939 for mobile applications
  • USB 2.0 Ports for programming & FLASH drive support
  • 32GB microSD Slot for Virtually Unlimited Data Logging

Its not my desire to market or prosper from what I am presenting here, just share what I have done and help you roll your own if you are so inclined.

Stettler Labour Day Fly In Pancake Breakfast

Our annual September Labour day pancake fly-in is coming up this weekend. My RV hanger gets used as the main feeding area and cook house. My CH701 hanger gets used by the model aircraft club for their static displays. I am having to abandon Tango Lima Lima for the next week as I clean up my mess and make the place ready for our guests. We typically have 80 to 100 aircraft fly in and serve over 600 meals in the short period of 3 hours. I’m the flight line director and control the ground movement of the aircraft coming and going. It gets totally hectic for a while as I try and keep the bottle necks un-plugged. We love it and so do all our guests.

Post Breakfast Update:

It was a fantastic day. The weather was great, winds were almost calm, slightly favouring runway 25. We had over 80 aircraft fly in to the event and we served in excess of 600 meals. There were no incidents in the circuit, other than some minor crowding between the fast and slow aircraft. We had a dozen RVs attend and it was a chance to meet and talk about our projects. Finally met Troy Branch from Calgary and had a look at his beautiful RV10. Nice work Troy!

First Engine Run and more

tll_first_run1 Tango Lima Lima, as she is now registered, was pulled from the hanger and towed over to the fuel pump. I added 20 litres of fuel to each tank and then pulled it back to the apron in front of the hanger. I followed the instructions of Precision Airmotive’s Eagle ECU specialist, Dennis Anttilla for starting the engine. For the first time in 4 years, it came to life with just a couple of revolutions of the prop. I ran the engine for a few minutes and then shut it down so I could look for oil leaks or what-ever. Sure enough, I had missed tightening down an oil line fitting on the oil cooler. This was quickly remedied and the mess was cleaned up. I fired her up again and then started taxi testing around the ramp area. It sure sounds sweet! I could idle down to 700 rpm and it was still smooth running. The big IO360 with straight pipes is going to make it’s presence known soon.

Ground handling is a lot easier than my previous experience with Mike Seager’s RV6A on a grass strip. Short radius turns are way easy with the castering nose wheel . I have not installed the engine cowlings so I limited the run time on the engine to ensure it didn’t get too warm. Probably not an issue on a cool evening at low power settings, but I’m being overly cautious. I found a few snags that I need to work thru prior to my Final Inspection by the MD-RA. Most concerning is the small fuel weep on the left tank. This weep is coming from the back side of the fuel tank so I will have to remove the tank to find it and fix it. Groan. I had pressure tested both tanks prior to attaching to the wing but I am told this happens. Not looking forward to that task but better now than in the winter months with frozen fingers on cold tools and fittings. There is also the slight odor of 100LL in the cabin when the boost pump is on. I will have to go over all the fuel line fittings one more time to find the leaker.tll_first_run3

The Eagle Screen is working really well. Up to now, all data received from the Eagle was static and it was difficult to validate all information was being displayed properly. I have a few points that need tweeking but this is normal stuff when you commission a new system. Data is streaming in from the Dynon and being displayed along with GPS data from a separate Garmin puck. It’s all coming together now. I’ll get some screen dumps posted to the blog in a week or so. I really like trend displays and I have set up a number of fast trends and slower historical trends with averaged and normalized values. This is a good way interpret how your engine is working and identify problems in the early stages.

Final assembly starts now

TLL in Hanger1 TLL in hanger2 TLL in hanger3With transport behind me, its time to get down to the last big job, namely final assembly. Today the wings went on, horizontal stab, elevators and vertical stabilizer. It had been a while since those components were last fitted but it all went together in four hours today. The open hanger door has attracted a few curious visitors who want to see what had been consuming my free time for the last few years.

I think the biggest task so far has been emptying my workshop and transporting everything I think I will need to the hanger. I was fortunate to have an empty hanger to start with and not have to deal with a pre-existing mess (like my other hanger the 701 sleeps in). There is a pile of tables and chairs against one wall which we use for our flyin breakfast on the labour day weekend, but so far the tables have proven to be quite valuable as I spread out parts and drawings.

I am truly fortunate to have such an understanding wife who puts up with this time and cash consuming obsession.

Tango Lima Lima rides to the hanger

The time had finally come when the project had to leave the garage and get to the hanger for final assembly. Earlier in the week, my son and I set up to load the RV9A on my car transport trailer. I had never actually measured the width of the trailer and was surprised to find the trailer was about 2 inches too narrow to safely hold the RV9A. I had seen many aircraft pictured on the Van’s Airforce forum travelling to the airport on the back of a sliding deck truck so that became plan B. Our local auto wrecker was recruited for the task. He showed up at 5pm, we loaded the aircraft, made the short 15 minute trip to the airport, unloaded right into my hanger and dropped me back off at home at 6:15. It was too easy!

IMG_0523 (600x800) (600x800)

Tango Lima Lima loaded and secured for the trip to Stettler

IMG_0522 (768x1024)

Wheel straps secured the mains to the truck deck. We used a short D-Ring strap around the nose gear to tug the aircraft onto the deck. I steered with the makeshift pull bar to centre the wheels on the deck.

IMG_0524 (960x1280)

I kept a close eye on the cargo as we headed down th ehighway

IMG_0525 (960x1280)

The hanger’s inner doors opened just enough to accept the truck deck

IMG_0526 (960x1280)

I guided the nose wheel with my makeshift pull bar while the truck driver let the winch cable out.

IMG_0527 (960x1280)

Tango Lima Lima slides into her new home

IMG_0528 (960x1280)

That was too easy! Now onto final assembly.