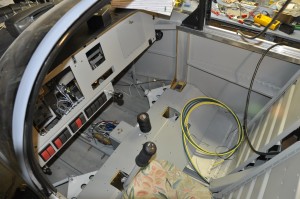
 I have completed a number of under the cowl tasks, installing the rest of the Vetterman exhaust system, wiring the alternator and starter and installing the cabin heat system. Time to take a break from that area and work in the cabin again. The instrument panel still comes out to allow acess to the wiring terminals on the bulk head. I have powered the electrical system up and verified my wiring is as per my drawings. Some red lines were required and I will update the computer files next time I am doing drawing updates. I am going to install my new PS Engineering PAR100EX radio now. The panel goes to the kitchen table where I can sit and relax while I do the wiring of this system. My wife is out of town for a few weeks so I can get away with leaving a mess on the kitchen table till this wiring task is done.
Skybolt fasteners day 2
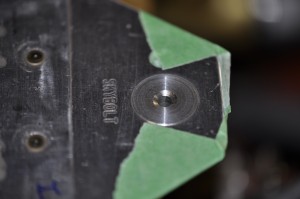
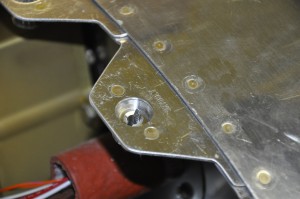 Here is the finished fastener riveted into the tab. Its a nicely engineered fastener. The internal locking ring of the fastener is threaded so its locking depth may be adjusted to compensate for varying fibreglass thickness. The end result is a flush fitting fastener on the cowl surface with little variation from fastener to fastener.
I will now be able to prime the cowl and get onto the next hundred items (who is counting) before final inspection day. The finished product is pretty good looking. 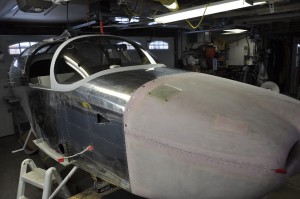 The gap between the cowl and forward fuselage skin is a bit wider than I was shooting for but it is the same width for the length of the joint. Once paint is on the gap will shrink and ther ewill be no chance of the cowl rubbing on the fuselage skin and making the paint flake off.
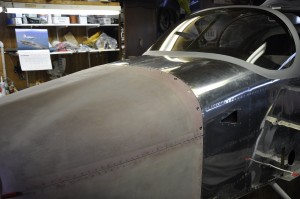
Good bye piano hinge – hello skybolt fasteners


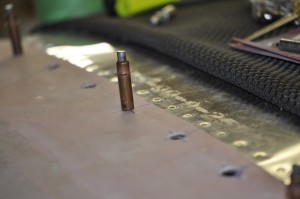 Good bye piano hinge, not all of them on the cowl but definitely the one across the top cowl section at the firewall. This thing has been a real pain from the get-go to feed the retaining wire into. I reduced the wire diameter to .090 wire from .120 as this will ease installation. Still a pain feeding wire thru a 4 inch square hole. Many RV builders choose the Skybolt Fastener system for part or all of their cowl retention system. A little on the spendy side at $200 for a complete kit with 16 fasteners, but over the long haul I am sure it will be worth it.
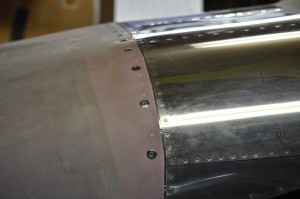
The kit comes with 18 aluminum tabs which have one end joggled to allow overlap with the adjacent tab. The spacing of the tabs is tweeked to make best use of the 16 fasteners (two spare tabs to screw up are provided). I spaced my tabs 3.5 inches (c-c) apart on the sides and then reduced the spacing to 3 inches (c-c) across the top of the cowl. Once riveted to the firewall flange, a number of Cleco inserts are taped in position (every third tab) and the cowl is put back in place. I installed a few trouble lights under the cowl and turned off the shop lights to allow me to see the cleco insert hole and then carefully drill the #20 hole for a cleco. I found this technique was OK but still not as accurate as I should have for a perfect fit. I removed the top cowl, and marked the exact position of the tab hole, its centre line and distance in MM from the forward fuselage skin. I replaced the cowl and then transfered these measurements to the cowl, drilled a pilot hole and then used the unibit to open the hole up to one size under the finished size of (CONFIRM). I used a twist drill to go to final size. At right the final drilling is almost complete and I am checking for accuracy.
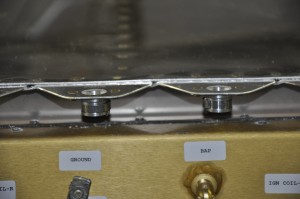
The skybolts come with two types of fastening flanges, one fixed and one floating. It is suggested to use three floaters on 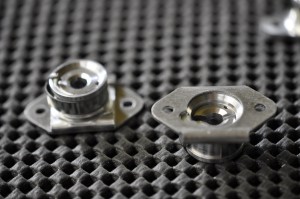 the each side and the fixed across the top. Other builders have reported this doesn’t make a difference. I chose to use the floating plates where my cowl fastener hole was not perfectly aligned with the tab hole. The fasteners are then flush riveted to the firewall tabs. That proved to be difficult in a few of the tight spots around the motor mounts and above the engine ECU. The No-hole rivet squeezer yolk was able to catch those rivets that the regular yolk was too fat to reach.

Throttle cable bracket (and happy new year)

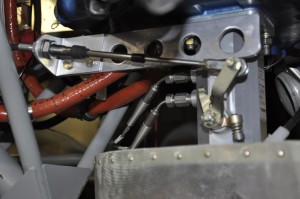
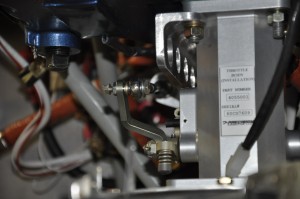 Building has finally resumed! The festive season moves RV building and shop time to “Priority 0” level. I return to building refreshed and tackle a lot of those “put off” jobs.
Take the throttle cable bracket for example. Nothing in the Van’s catalog will work for this particular throttle body so its up to builder to come up with something secure and solid. I made the first bracket, call it the prototype, out of 1/8″ 6061 angle. After initial test fit I found it had too much flex and given that it cantilevers aft about 8 inches I wanted to ensure there would be no chance of failure after a few years of vibration. I increased the bracket arm to 1/4″ 6061 angle and made a few lightening holes along its length. It looks simple but took a good day to complete this item and tune the aft angle to best position the cable end for the throttle body arm.
TC4 connections
The attached pdf document illustrates the connection to the Eagle, GPS and other devices at a high level.